ShopDreamUp AI ArtDreamUp
Deviation Actions

So I've had a bunch of people ask me for some help on sculpting these little critters so I'm putting together this little tutorial to maybe help some of you out here that need a little tip here or there ;3
So first off, instead of wasting a ton of clay, I like to take a piece of aluminum foil

Size depends on what size of critter your making and then I wrap it into roughly the shape of what I'm going to work on and position it how I want it to be

Not only do you not waste extra clay, but it's important so that when you make larger pieces your sculpture is strong enough to withstand the weight while baking. Next you'll want to knead out some clay that you're going to be using as your body color and wrap it around the foil

Work the clay into the shape of the head and the body, mainly focusing on the head. Keeping smoothing the head out until you get it just about perfect, the body doesn't matter so much at this point because we're going to have to keep working with it, so for now, just get the head how you like it

A lot of the question have been on poses so for this one I'm picking the most difficult pose being a full standing guy with a curled upright tail. This is important because all of these require extra structure than just a laying or sitting one with a downed tail. So for the tail to maintain its nice curve and staying upright position you're going to need a piece of wire almost the length of the tail. Roll out a ball of your body color clay and taper the end then get your wire.

Curve the wire to roughly the shape you want the tail to sit. And instead of feeding the wire through the tail, I like to just impress it from the inside of the tail then smooth the clay over the wire. Then attach the tail to the body and smooth most of the clay together.

And since I also got a bunch of requests on the whole rainbow thing I'll show you how to do a rainbow belly. Take a bunch of logs of each color and lay them next to each other in the rainbow procession and squish them together so they stick and then run them through your pasta machine, I used #5. If you don't have a pasta machine use a roller just be very careful not to push too hard and split the colors apart.
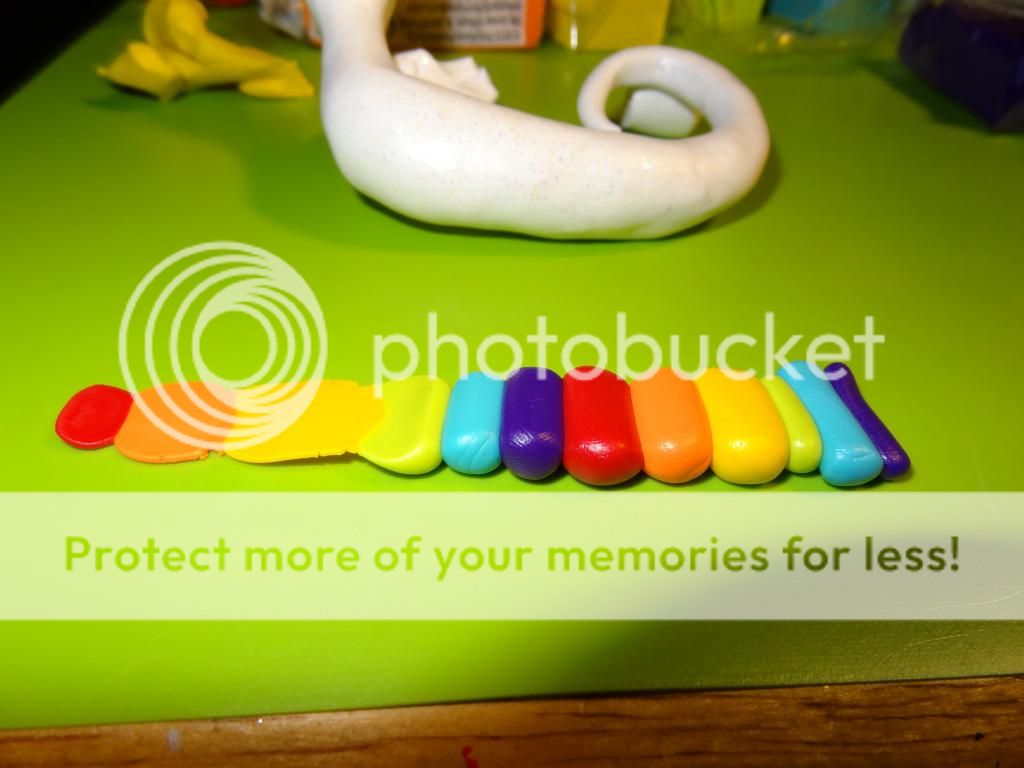
Next cut out your belly shape. I like going from a small chin and neck area to a wider fat belly then tapering down along the tail


Next just place it on your dragon and smooth it out and I like to blend the edges down so it's not a hard edge and appears to be more apart of the body than just something you stuck there :3

Now for the fun part T_T Don't mind my sarcasm. Next. You'll make up the leg structures out of foil. When doing a standing structure you REALLY need this otherwise when you're sculpting and while you're baking your piece will just deform and crumble. So make 4 pieces that roughly look like what your legs are going to be.

And then just as you did with the body, you're going to wrap the legs and attach them to your body. This is where you can start smoothing the crap out of everything ^_^

The good part is, after you've done this step you've got all the difficult stuff out of the way and can move on to more fun things, like eyes!

Ears and horns!

And because this guy was a rainbow I figured I'd give this dragon hair like I would one of my ponies, so he's kind of....a maned dragon lol.

Just keep making a bunch of different colored snakes and attach them to your tail and neck till you get a nice full tail and mane :3

For the wings I just went with some simple Pegasus wings. Might as well since this particular dragon is kind of a mash of a bunch of different aspects so I can show a lot of them.

And then it's time to bake that bad boy! Do any final smoothing and positioning you see fit and then follow your clays recommended baking times and temperatures. Once he's done its time for some glaze!!!!

Take your time with this part. You didn't just go through all that work to end up with a bunch of bubbles or drips in it. And then WAAAA LAAAAA!!!! You have a critter ^_^


A few random tips, since I was working with a white base, if you feel like doing the same, wash your hands REALLY hard before starting on any kind of light colors. I mean like, billow pad your hands lol. Even dead skin will come off as dirt when you're smoothing your piece. I also find it helpful to have a scrap piece of white lying around to get any remaining hairs or fuzz that may linger on your hands after washing and drying them. Don't use a fuzzy towel to wipe your hands off between colors, get something that has a tight weave that's not likely to leave little stray hairs in your clay. And ANYtime you get done working with red.....do yourself a favor and go wash your hands lol. Seriously, it never comes off without a good scrub.
I hope this helps some of you out. If there's something else you'd like a tutorial on let me know! I'm all up for helping anyone get better at their craft. And if you do by chance use this tutorial, would you mind linking your creation? I'd love to see what you came up with!!
___________________________________
Dragon sale!!!
DRAGONS AWAY!!!
https://www.etsy.com/shop/LittleCLUUs
Final hours for the Kickstarter!
Last few hours to get the deal!!
https://www.kickstarter.com/projects/littlecluus/littlecluus-custom-dice
Sale is now live
Got a few dragons and some dice for everyone! All now live!
https://www.etsy.com/shop/LittleCLUUs
INCOMING KICKSTARTER
****30 DAY ONLY KICKSTARTER****
So...you've wanted some dice. Or maybe even a guardian. Well here's your opportunity to grab them at one heck of a steal! This will only be available for 30 days from right now. And there are limits on some of the rewards. But I'm doing this to not only give everyone a good deal, but because I need more equipment. So please share this! I'd love to see this move quicker than what I can do and I'd love to be able to make even more for everyone!
https://www.kickstarter.com/projects/littlecluus/littlecluus-custom-dice
© 2014 - 2024 LittleCLUUs
Comments85
Join the community to add your comment. Already a deviant? Log In
The eyes, are they sold like that or do you paint the eyes?
Where would one buy them? I found a bunch of them on Amazon, but not actual eyes...
Where would one buy them? I found a bunch of them on Amazon, but not actual eyes...